How to Install a Home EV Charger: Complete Step-by-Step Guide
Installing a home EV charger is one of the best investments you can make as an electric vehicle owner. While charging at public stations works in a pinch, having a Level 2 charger at home means waking up every morning with a full battery. This comprehensive guide walks you through everything you need to know about home EV charger installation, from choosing the right equipment to understanding electrical requirements and costs.
Understanding EV Charging Levels
Before diving into installation, it's essential to understand the different charging levels available for electric vehicles. This knowledge will help you make an informed decision about which type of charger best suits your needs.
Level 1 Charging (120V)
Level 1 charging uses a standard 120-volt household outlet—the same type you use for your phone charger or lamp. Every electric vehicle comes with a Level 1 charging cable. While convenient because it requires no installation, Level 1 charging is slow, adding only 3-5 miles of range per hour. For a typical EV with a 60 kWh battery, a full charge from empty could take 40-50 hours. Level 1 works for plug-in hybrids or drivers with very short commutes, but most EV owners quickly find it insufficient.
Level 2 Charging (240V)
Level 2 charging is the sweet spot for home charging. Using a 240-volt outlet (the same voltage as your dryer or oven), Level 2 chargers deliver 15-60 miles of range per hour, depending on the amperage. Most home Level 2 chargers operate at 32-48 amps, providing 25-37 miles of range per hour. This means even a large battery pack can be fully charged overnight. Level 2 is what this guide focuses on because it offers the best balance of speed, cost, and practicality for home use.
Level 3 / DC Fast Charging
DC fast chargers can add 100-200+ miles of range in 20-30 minutes but require industrial-grade electrical infrastructure and cost $30,000-$100,000 or more. These are exclusively for commercial installations and not practical for residential use.
Choosing the Right Home EV Charger
Selecting the right charger involves balancing charging speed, features, and budget. Here are the key factors to consider when shopping for a home EV charger.
Amperage and Charging Speed
Home EV chargers typically come in 16, 32, 40, or 48-amp versions. Higher amperage means faster charging. A 32-amp charger delivers about 25 miles of range per hour, while a 48-amp charger provides approximately 37 miles per hour. For most drivers, a 32-amp charger is sufficient—it can fully charge most EVs overnight. However, if you have a vehicle with a large battery (like a Rivian R1S or Ford F-150 Lightning) or drive 100+ miles daily, a 48-amp charger offers more flexibility.
Hardwired vs. Plug-In Installation
Chargers can be either hardwired directly to your electrical panel or plugged into a 240V outlet (typically a NEMA 14-50 outlet, like those used for electric stoves). Hardwired installations are permanent and often required for 48-amp chargers. Plug-in chargers offer portability—you can take them if you move—and typically easier installation. For most homeowners, a plug-in charger with a NEMA 14-50 outlet offers the best combination of performance and flexibility.
Smart Features
Modern EV chargers come with various smart features that can enhance your charging experience. WiFi connectivity allows you to monitor charging status and history from your phone. Scheduled charging lets you take advantage of off-peak electricity rates, potentially saving hundreds of dollars annually. Energy monitoring tracks your charging costs. Some chargers integrate with home energy management systems or solar panels. While basic chargers work fine, smart features can provide convenience and long-term savings.
Top Home EV Charger Recommendations
Based on reliability, features, and value, here are some of the best home EV chargers available in 2026. The ChargePoint Home Flex offers excellent smart features and adjustable amperage (16-50 amps) for around $600. The Grizzl-E provides rugged durability and solid performance at a budget-friendly $400. The Wallbox Pulsar Plus features a compact design and advanced app controls for about $650. Tesla owners might consider the Tesla Wall Connector at $475, which offers seamless integration with Tesla vehicles. For premium features including load management and sleek design, the JuiceBox 48 runs approximately $650.
Electrical Requirements and Assessment
Before purchasing a charger, you need to assess your home's electrical capacity. This step is crucial and may require consultation with a licensed electrician.
Evaluating Your Electrical Panel
Most homes have either 100-amp, 150-amp, or 200-amp electrical service. A Level 2 EV charger typically requires a dedicated 40-60 amp circuit. For a 48-amp charger, you'll need a 60-amp breaker (electrical code requires the circuit to be rated 125% of the charger's continuous load). If your panel is already near capacity with air conditioning, electric heating, and other major appliances, you may need a panel upgrade. Many homes built before 2000 have 100-amp service, which may be insufficient without upgrading. Homes with 200-amp service typically have plenty of capacity for EV charging.
Distance from Panel to Charging Location
The distance between your electrical panel and where you'll install the charger significantly affects installation cost. Longer runs require more wire, conduit, and labor. Installing near the panel (within 25 feet) is ideal. If your panel is in the basement and you want to charge in a detached garage 100 feet away, expect substantially higher costs. Consider the charging location carefully—you'll want enough cable length to reach your EV's charge port regardless of which direction you park.
Permit Requirements
Most jurisdictions require an electrical permit for EV charger installation. This ensures the work meets local building codes and is inspected for safety. While it adds cost and time (permits typically run $50-$200 and inspections may add 1-2 weeks), proper permitting protects you and your home. Some areas now have streamlined permitting processes specifically for EV charger installations. Your electrician should handle the permit process as part of their service.
Installation Process: Step by Step
While we strongly recommend hiring a licensed electrician for safety and code compliance, understanding the installation process helps you prepare and communicate with your contractor.
Step 1: Site Assessment
The electrician will evaluate your electrical panel's capacity, determine the optimal route for running wire, and identify any challenges. They'll confirm whether your panel can accommodate the new circuit or if an upgrade is needed. This assessment typically takes 30-60 minutes and may be included in the installation quote or charged separately ($75-$150).
Step 2: Materials and Permits
Based on the assessment, the electrician will specify required materials: wire gauge (typically 6-gauge for 48-amp circuits), conduit, outlet or junction box, and breaker. They'll pull the necessary permits and schedule the inspection. Good contractors handle this entire process.
Step 3: Running the Circuit
The electrician will run appropriately sized wire from your electrical panel to the charging location. This may involve drilling through walls, running conduit along exterior walls, or trenching underground for detached garages. The wire connects to a new dedicated breaker in your panel. For plug-in chargers, they'll install a NEMA 14-50 outlet. For hardwired chargers, they'll install a junction box.
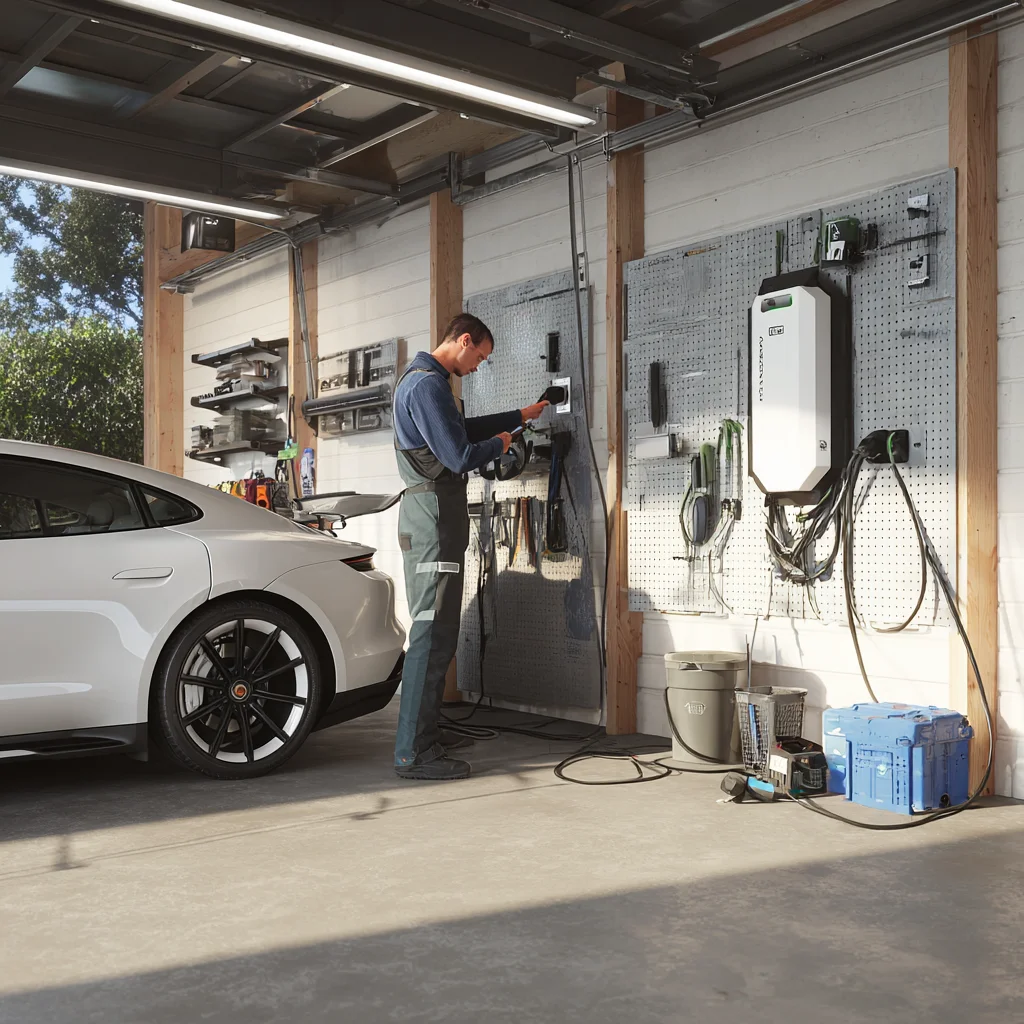
Step 4: Mounting the Charger
The charger mounts to the wall at an appropriate height (typically 42-48 inches from the ground). For plug-in models, simply plug into the outlet. For hardwired installations, the electrician connects the charger's wiring directly to the circuit.
Step 5: Testing and Inspection
The electrician will test the installation to ensure everything works properly. They'll verify correct voltage, test the charger with your vehicle, and demonstrate operation. The local inspector will then verify code compliance and sign off on the permit. Once approved, you're ready to charge.
Installation Costs: What to Expect
Home EV charger installation costs vary significantly based on your specific situation. Here's a breakdown of typical expenses.
Charger Cost
Quality Level 2 chargers range from $300-$700. Basic non-networked chargers start around $300, while smart chargers with apps and scheduling run $500-$700. Premium units with advanced features can exceed $800. We recommend budgeting $500-$600 for a good smart charger from a reputable brand.
Basic Installation
If your panel has capacity and the charging location is near the panel (within 25 feet), basic installation typically costs $300-$800 including labor, materials, and permit. This is the best-case scenario and applies to many newer homes with attached garages.
Complex Installation
Longer wire runs, conduit requirements, or difficult access can increase costs to $1,000-$2,000. Running power to a detached garage might cost $1,500-$3,000 depending on distance and whether trenching is required.
Panel Upgrade
If your electrical panel lacks capacity, upgrading from 100-amp to 200-amp service costs $1,500-$3,000. While significant, this upgrade benefits your entire home and may be necessary anyway as homes add more electrical loads.
Total Cost Range
For most homeowners, total installed cost (charger plus installation) ranges from $1,000-$2,500. Simple installations can come in under $1,000, while complex scenarios requiring panel upgrades and long runs might reach $4,000-$5,000. Get multiple quotes from licensed electricians to understand your specific costs.
Incentives and Rebates
Various incentives can significantly reduce your EV charger installation costs. The federal government offers a tax credit of up to 30% of installation costs (up to $1,000) for residential EV charger installations through 2032. Many states offer additional rebates—California, for example, provides up to $1,500 through certain utility programs. Some utilities offer special EV charging rates that reduce your electricity costs during off-peak hours. Check with your utility company, state energy office, and the Database of State Incentives for Renewables & Efficiency (DSIRE) for current programs in your area.
DIY Installation: Should You Do It?
While some handy homeowners consider DIY installation, we recommend professional installation for several important reasons. Working with 240-volt circuits is dangerous—mistakes can cause electrocution, fires, or damage to your vehicle. Professional installation ensures code compliance and proper inspection. Many charger warranties require professional installation. Your homeowner's insurance might not cover damage from unpermitted electrical work. The cost savings from DIY ($200-$500) aren't worth the risks for most people.
Tips for a Smooth Installation
To ensure your EV charger installation goes smoothly, follow these practical tips. Get at least three quotes from licensed electricians with EV charger installation experience. Ask about their experience with your specific charger brand. Verify they'll handle permits and inspections. Consider future needs—if you might get a second EV, installing a higher-amp circuit now costs little extra. Install the charger where it's protected from weather but accessible for daily use. Ensure adequate cable length to reach your EV's charge port from any parking position. Choose a charger with a cable at least 25 feet long for flexibility.
Conclusion: Invest in Home Charging Convenience
Installing a home EV charger is a straightforward project that dramatically improves the EV ownership experience. While the upfront cost of $1,000-$2,500 might seem significant, the convenience of waking up to a full battery every day is invaluable. With available incentives potentially cutting costs by 30% or more, and the elimination of public charging fees and time, home charging often pays for itself within a few years. Whether you're a new EV owner or finally ready to upgrade from Level 1 charging, a home Level 2 charger is one of the best investments you can make.